HERA 2.1 Beta

[ HERA | Help | Info | Code | Contact ]
Once you have given the address of the page to revise, HERA shows a summary of the information from the automatic analysis and a result for each checkpoint.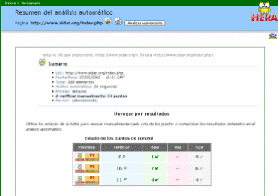
 Pass
Pass  Needs checking
  Fail
Fail  N/A
N/A At this stage there are always a certain number of checkpoints that must be testedd by a user. Once a person has tested a particular checkpoint they can use the form to record or edit the results of the test. The form offers two possible options in addition to those given.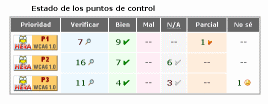
 Partial
  Cannot tell
Each checkpoint can require checking one or several things, each of which can have their own result. If the results of several tests for the same checkpoint are not the same, the overall result for the checkpoint is that of the worst result. For example if one of the items is "failed" the checkpoint has been failed, whatever the results of other tests.
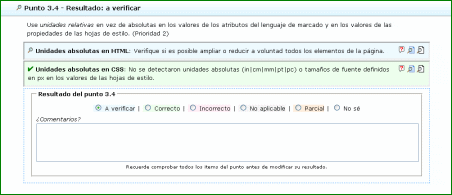
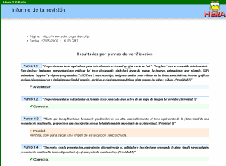
HERA offers various options to help the tester revise each item. When it is possible, the elements that need revision are indicated. Following this text are three icons for the help deocumentation.
 Show or hide the instructions for performing the revision
 Shows the page in a seperate window with the elements that have to be testede highlighted with colours and icons, and generally shows the relevant code fragment for each part. Because these elements added to the original page can disturb the layout to make it unreadable, their is an option to disactivate the original styling of the page.
 Show the source code of the page in a window, highlighting the items which shuld be checked.
In this way, using both views of the page to help, the tester can identify important parts of the page, verify their use, and decide the appropriate result for each item of the checkpoint.
Two icons, next to the URI of the page being revised, allow you to open the original page, or see its source code - in both cases with none of the previous options applied.
 Open the page in a new window.
 Open a new window to show the source code of the page.
 Return to the summary page, wheree you can choose the navigation by checkpoints mode.
 Show or hide the help texts for each checkpoint.
 Show or hide the form to record / edit the results for each checkpoint.
 Leads to a form which requests general information about the revision. The report can be presented in various formats (XHTML, RDF/EARL and PDF).
The full review an be done by navigating through results table or by guidelines numbering.
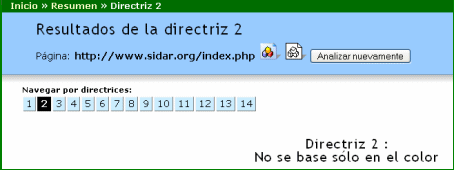
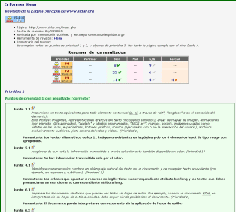
In Summary page you access to guidelines navigation (presented by means of buttons at the end). Once this option has been chosen, the checkpoints of the selected guideline will appear in order to be review. To facilitate the navigation through guidelines, there appear in the top of the review page the buttons with the number of each one of them.
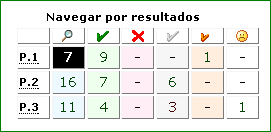
To navigation by results it is acceded from the table summarize of such. This form of navigation can do animated the task more because it is seen clearly the points that are solved, specially when the reviewer is working on his own site and he can fix the found failures. In the superior part of the revision page it appears the table that is showing the results with the modifications indicated by the reviewer.
When pressing on the icon to ask for the report it will appear a form in which the reviewer can indicate his name, e-mail, the title that he wants to give to the report, and a field to introduce a general commentary.
It can then be selected what types of results (to verify, correct, incorrect, nonapplicable, partial, I do not know) are desired to include in the report, or if it is desired to include all.
Once you have done this, you can choose the type or the types of information report to generate, as we see next.
 In the form there is a button to see the report in HTML format, that will open a new window of the browser with the report in that format, which supposes that it can be printed directly from there, using the button or the menu option to print of the browser who is being used.
Also there is a special button to unload the report in HTML format. This way, can keep with the name that is desired, to publish them in the Web or to publish them in paper. The reviewer can then, if he requires it, create a special style sheet for the impression, so that letterhead of its company adjusts to the paper and to add it to the files in unloaded HTML.
 HERA also generates the report in format RDF, thus contributing to that we have and we take advantage of the possibilities a semantically richer Web.
The "RDF report" button, will open a new window of the browser with the content of the report in EARL language and RDF format. It is possible that some user cannot see directly in his browser the report, if uses an old application incapable to support XML, but is not necessary to worry, because these information are not thought to be read by the humans but by the machines. But, he can used, if he want it, the script for visualization of information, and will be able to publish itself in his own Web, so that they are legible and attractive for the human and agreed users with the general aspect of his own Web site.
The "downnload report RDF" button allows, as its name indicates, to download the generated report file, to keep it and to publish it where and as it is desired. The reviewer or review team can choose to use the script before mentioned, or to directly publish the RDF files linked from each one of the pages that have been reviewed. He will even be able to generate a graph of the review work, using the W3C RDF validator.
 PDF report." />One more an option, consists of generating the report in PDF format. This one is a version in gross, so that the HERA user can download it and make the opportune marks, structuring, and modifications to publish it in that format with the layout design that he prefers. (Please, do not forget to structure the document before publishing it, so that it is most accessible possible).
Once made the opportune revision and, upon its case, modifications to reach the wished level of accessibility, it is suitable to declare it. For it it can use one of the following icons and link it with the report in format RDF generated by HERA. This way robots will be able to index their page between which they fulfill certain characteristics of accessibility. If it has not published the report, you can link the icon with the WAI conformance page.
You can choose one the following icons of "classic" style in agreement with the reached level:
![]()
![]()
![]()
Or to choose the appropriate icon of modern style:
![]()
![]()
![]()
Or create one of these buttons using only stylesheets:
Los estilos usados en esos botones están definidos en botonhera.css.
Los desarrolladores y consultores encontrarán útil provocar la ejecución de HERA directamente desde un botón en su navegador. Para ello ofrecemos aquí varias opciones:
Extensions for the Mozilla family browsers: The users of the Mozilla family browsers (Firefox, Flock, Netscape, Safari, etc.) they can install HERA-Extension, that allows to initiate the oage or frame revision, with a single click, that is visualizing then. The extension installs a bar and a button in the state bar of the browser.
Los Favelets o Bookmarklets son pequeños fragmentos de JavaScripts incrustados en un enlace y que permiten añadir su funcionalidad al listado de favoritos del navegador.
Para su funcionamiento requieren del soporte de JavaScript en el navegador. La mayoría de los Favelet funcionan bien en Internet Explorer 5.0 o superior y en los navegadores de la familia Mozilla 1.0 o superior (Incluidos Netscape y Firefox).
Estos que aquí presentamos han sido probados en Internet Explorer 6.0, Mozilla 1.7.7, Mozilla 1.8a6, Netscape 7.2, Firefox 1.0.4, Opera 7.50 y Opera 8.0.
Para tener un acceso directo a HERA desde su navegador, bastará con que arrastre uno o varios de los siguientes enlaces a la barra de favoritos del mismo. Se creará un botón o acceso directo. Entonces, cada vez que desee usarlo bastará con que pulse o seleccione el botón que desee utilizar.
Estos Favelets o Bookmarklets han sido creados por Emmanuelle Gutiérrez y Restrepo, con la colaboración de Vincent Tabard y del equipo de Opera Software.
Los desarrolladores que utilizan Mozilla o Firefox suelen usar una extensión creada por Chris Pederick llamada "Web Developer Extension" y que añade un menú y una barra de herramientas con una serie de funcionalidades útiles para comprobar determinados aspectos de una página Web.
La extensión ofrece acceso directo a una serie de revisores y es muy sencillo agregar una opción para revisar con HERA:
Una vez que se tiene instalada la extensión, pulsando con el botón derecho del ratón sobre cualquier página abierta, seleccione "Web Developer" >> "Options" >> "Options." (Si ha instalado la versión en español las opciones serán "Opciones" >> "Opciones..".
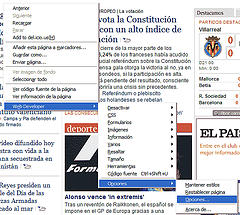
En el cuadro de diálogo que se abre, seleccione "Tools" y pulse el botón "Add" (En español: "Herramientas" >> "Añadir").
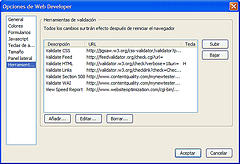
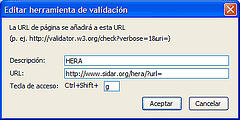
Se abrirá un cuadro de diálogo en el que se debe indicar el nombre de la herramienta (en este caso, HERA) y un campo para la URL en la que hay que poner: "http://www.sidar.org/hera/?url=", también se puede indicar un atajo de teclado para activar la revisión con HERA.
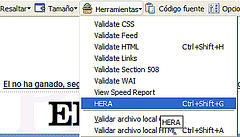
Y ya está. A partir de entonces, bastará con pulsar con el botón derecho del ratón sobre la página que se esté visitando y seleccionar: Web Developer >> Tools >> HERA, o pulsar la combinación de teclas indicadas para el atajo antes definido, y se iniciará la revisión.
(Las imágenes que ilustran este proceso han sido cedidas por Daniel Torres Burriel.)
Toby Inkster ha creado un menú especial para desarrolladores que utilizan Opera. El Opera W3-Dev Menu, ofrece acceso directo a herramientas de revisión y documentación de interés sobre estándares, accesibilidad y usabilidad (Por el momento todo está en inglés, pero estamos traduciéndolo).
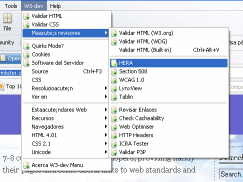 El menú se instala directamente desde la página de descarga y puede agregarse HERA muy fácilmente a él. Para ello, una vez instalado, basta con editar el fichero "v3dev-1.99.ini" que se encontrará en la carpeta "menu" del directorio "profile" de la instalación de Opera. (Como la instalación puede ser muy distinta según la configuración del sistema operativo, lo más sencillo será localizar el fichero mediante el buscador del sistema).
Una vez localizado el fichero, puede abrirse con cualquier editor de texto, y en la línea 55 pegar la siguiente cadena de texto: «Item, "HERA" = Go to page, "http://www.sidar.org/hera/?url=%u"». Si el editor no muestra los números de línea, basta con localizar el texto: «[Actions Menu]» y pegar la cadena antes mencionada tras: "----1". Esta operación no debe hacerse teniendo Opera abierto. Una vez editado el fichero, puede abrirse Opera y aparecerá el menú con el acceso directo a HERA que permitirá revisar la página que estemos visitando en ese momento.
If you have any questions about how to perform tests, or suggestions on how to improve this tool, please send them to: hera@sidar.org.
![]()
Copyright © Sidar 2003-2005
Development: Carlos Benavídez